High Dynamic Range
<1> FREE HDR TUTORIAL FOR WINDOWSEven though you can make a good HDR photo from a single RAW, I often prefer to use Autobracketing. Autobracketing allows your camera to take multiple photos (say 3) in rapid sequence. Each one of those photos will be at a different shutter speed.
I also use a tripod. You might want to also if you are planning on low-light photos like sunsets and these sorts of things. You can do everything handheld, but using a tripod is actually a lot of fun!
Put your camera into Aperture Priority mode and turn on Autobracketing. Set up your autobracketing to take three photos at -2, 0, and +2. Some cameras can do more, some less. Do what you can with your camera. For example, on my Nikon D800, it can take 9 photos, stepping by 1, so I could do -4, -3, -2, -1, 0, +1, +2, +3, +4. But that is crazy. I so rarely do that. 95% of the time, I take 5 photos from -2 to +2. There is no discernible advantage in stepping by 1, by the way. I’m just letting you know that most cameras are different, and don’t fret if yours does it differently.
Other best practices:
Just drag the single RAW photo (or open) into Photomatix. You can go through the exact same process as below. It doesn’t always work out perfectly, but for 70% of shots, you can still use a single RAW. It fails often in very extreme lighting situations.
https://www.flickr.com/photos/cleever/255026221
The tonemapping of
Photomatix is a pretty strong tool to get some detail back into over or
underexposed images, as long as there is detail in the first place. It won’t
turn a totally black silhouette into visible detail, and the same goes for a
blown out overexposed white spot...
Now that we know that
first creating several exposures in Photoshop is not required, as this is
basically the same thing that Photomatix does with its tonemapping, our list of
steps changes to:
1. Open the photo in
Photomatix.
2. Open the photo again
in Photomatix.
3. Generate and tonemap
the HDR!
So that saves you a lot
of trouble and work! And who wants to do unneccesary work?
To save even more time
you can copy and paste all your photos in the same folder to create copies, and
then drag the original and copy into Photomatix right away, instead of having to
open the same image twice. Deleting all the copies afterwards doesnt take as
much time as opening each photo twice in Photomatix.
But are the tonemapping
settings the same?
Not always. Of course the
settings depend completely on the result you wish to achieve. But in short, you
have to do a few things to make sure not to get too much noise, and saturation.
Apparently when working with 1 jpg, the noise and saturation get a lot higher
than when I use three "real" separate exposures.
Try the following
settings in Photomatix:
Luminosity: between -2
and +2
Strength: between 30% and
60%
Saturation: between 30%
and 50%
White clip: set slider
about halfway
Black clip: set slider
about 1/10th from the left.
Smoothing: High!!! This
is really important...
To reduce noise
and halos:
Smoothing should be on
high (reduces noise and halos) and luminosity should be 2 or lower. Higher
luminosity reduces halos, but creates a lot of noise. The lower you set the
general Strength, the less noise and halos.
I hope you have enjoyed
this tutorial, and I hope it will yield some nice results. Finally you can take
HDR shots with your cheap compact camera straight from your bike or out of your
car window whilst driving past something! Or you can pay attention to traffic of
course! :)
For more tutorials written about HDR, Photoshop, and lighting, click here...
HDR TV - info-1 (2/2016)
How do I know if a TV is HDR compatible?
With the UHD Premium label, we now know the precise specifications to which a TV
must conform in order to be considered HDR compatible.
Our guide 'What is Ultra HD Premium?' provides an in-depth breakdown of what the logo and what it means.
What's all this OLED vs LED talk and does it affect HDR?
the UHD Alliance has got around the problem by introducing two standards:
STANDARD 1: More than 1,000 nits peak brightness and less than 0.05nits black level.
STANDARD 2: More than 540 nits brightness and less than 0.0005 nits black level.
While standard one demands higher brightness and tolerates a higher black level, standard two tolerates a lower brightness and demands a lower black level. This means manufacturers looking to make LED HDR TVs, which most are, will abide by standard one, while OLED TVs will be able to gain the Ultra HD Premium label by conforming to standard two.
10bits is not HDR.
These monitors have been abound for a while using the name "deep color", not
"HDR".
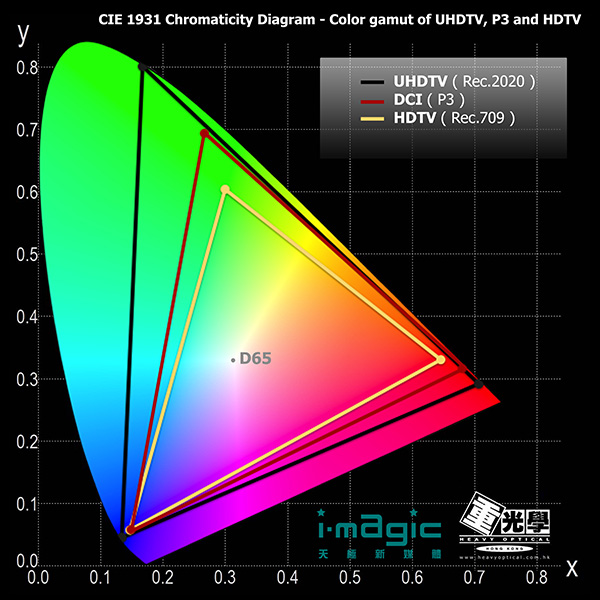
The right thing to ask is "what is the colorspace". A "colorspace" represents the range of colors representable by a display. Here's a handy chart
The total area of the chart represents the colors a human eye can see, the triangles represent different "colorspaces". The points of the triangles represent the shades of red, blue, and green that can be mixed together to create the colors in between. Right now we are at the smallest triangle, REC 709, and have been since, well practically since color TV was invented. The "bits" as in "10 bit, 8 bit" etc. come in when you want to display the colors in between the far points of the triangle.
Right now we have (for the most part) 8bit monitors, in binary that plays out to each color (Red, blue, green) having 256 shades each to combine together to make the colors in between. For REC 709 that's fine, you won't see banding (mostly).
...
Asset creation will be the hard part. Right now every studio does REC 709 textures and colorspace and etc. The cameras for texture sampling are set up for REC 709, the camera color checkers are, the monitors are, the GPUs are, the modeling software is. All of that will have to be replaced, ideally from the moment real production begins (years in advance of release for triple A games) to produce assets that are meant to be displayed in the higher colorspaces.
Posted 20 December 2015 - 02:12 AM:
I actually went and read an article about the announcement -- http://www.extremetech.com/gaming/219038-amds-radeon-technologies-group-highlights-next-gen-display-standards-new-freesync-capabilities
Apparently a "HDR" display:
* uses 10 bit per channel instead of 8 bit.
* is 4 times brighter than current screens (maybe 40 times in the future).
* and maybe uses the Rec.2020 instead of sRGB or Rec.709.
10bpc is nice, but not new -- as mentioned earlier, it's called "deep color" and it's been around for a decade in the consumer market, though uptake has been low.
Lots of 8bpc displays can actually already accept 10bpc signals, which they display via dithering.
On that note - lots of cheap LCD displays are actually only 6bpc, but they use dithering to display the 8bpc signal!
Brighter screens are always nice, but lots of people will turn them down anyway All that matters is whether it can produce 256 (or now 1024) discernible steps between it's min and max brightness, spaced correctly as per it's color space. However, it is important to note that color spaces such as sRGB do actually define the brightness of the display, and the ambient brightness in the viewer's room -- the ambient brightness will actually effect the way that you perceive color!
10bits gives us 4x more values than 8bit, so a 4x increase in brightness makes sense... but if they're going to ramp that up to 40x brighter, than we'll need more than 10bpc....
Switching to Rec.2020 instead of sRGB is going to be a massive pain in the ass -- unless there is some kind of API created where you can ask the monitor what color space it's using.
At the moment, sRGB is great because it's the standard for PC graphics -- it's the color space of the internet. There's no existing way to ask your monitor what color space it's using, but because sRGB exists and everyone accepted it as the standard, it's safe for games to simply assume that outputting sRGB values is the right thing™ to do.
If a new standard shows up on the scene, all that goes out the window. This would be ok if we can query the monitor -- the game's tonemapper can be configured to either convert to sRGB or to Rec.2020 -- but if we can't query the monitor, we can't ship artwork that's going to look the way in which the artist's intended.
At the last studio I worked for, we had a testing room with multiple properly calibrated displays, and a few "factory default" ones (usually has all the stupid "enhancement" sliders at 100%, oversaturating everything). All of the textures and post-fx would be tuned to look perfect (as decided by the art director) on the properly calibrated screens, while still looking adequate on the the badly tuned "factory default" ones. Adding a new color space adds a 3rd batch of screens to tune for, but now two of those batches are "authoritative", and in a tug of war against each other